Oh no. That’s the fourth flying insect you’ve spotted in your RV today, which has you wondering where these bugs are getting in from. Perhaps there’s an opening somewhere in your vehicle that you hadn’t noticed but the bugs did. You need to caulk the gap, but which type of caulk should you use and why does it matter?
For RVs, marine-grade adhesive sealant caulk is your best bet. This water-resistant product is known for its durability and strength, two factors that will promote its longevity. Not every type of caulk is so long-lasting, so you must choose carefully.
In this guide, we’ll introduce you to the different types of caulk and then elaborate further on the best option for sealing your RV. We’ll even have a section full of tips so you can sufficiently caulk your vehicle if this is your first time!
The Types of Caulk for Your Camper
If you’ve ever wandered through the caulk aisle at your local home improvement store (or just typed “caulk” in on Amazon), you’ll quickly realize that there are so many types of caulk to choose from. It’s tempting to buy the same brand you used to caulk your bathroom last month, but can that caulk stand up to the rigors of RV life?
Maybe, maybe not. We’ll go over the best type of caulk for RV use in the next section, but for now, let’s cover the different types of caulk.
Fireproof Caulk
Although it’s less commonly encountered, fireproof caulk is still caulk, and hence it deserves a spot on this list. Often a bright red hue, fireproof caulk is a favored choice when insulating a structure, especially if electrical or plumbing lines are nearby. This type of caulk is almost always reserved for buildings and homes, not RVs.
Butyl Rubber Caulk
The quality of butyl rubber caulk is almost like asphalt. Most people say this caulk is sticky and tends to make a mess, so be careful if you’re using it. The best application of butyl rubber caulk is for outdoor use such as repairing chimney foundations and flashings as well as patching up the roof. It could apply to RV use.
Adhesive Caulk
Adhesive sealant caulk bonds incredibly well, almost acting as a glue in some cases. Like when working with butyl rubber caulk, avoid getting adhesive sealant on your skin or clothing as best you can. You can even buy mold-resistant adhesive caulk!
Silicone Sealant
A smart choice if your bathtub seals have weakened, silicone caulk is resistant to mold and mildew in many cases. While it sticks especially well on anything nonporous, the moment you begin using it on porous surfaces such as drywall or wood, the worse it works. Thus, silicone caulk should not come with you on your RV trips.
Siliconized Acrylic Sealant Caulk
The benefits of silicone combine with the sticky quality of acrylic in siliconized acrylic sealant caulk. You can use this caulk on a more encompassing variety of surfaces, including those like glass, metal, tile, and porcelain. That said, for outdoor use, this isn’t a caulk you should gravitate towards.
Acrylic Tile Sealant Caulk
For small patchworks across the house, acrylic tile sealant caulk is reliable. You can’t really use it anywhere that’s wet, but this caulk does have some resistance to mildew and mold. One perk is that you can paint over acrylic tile sealant caulk so it blends into the rest of the caulk. An application may last for years.
Vinyl Latex Caulk
Sort of like painter’s caulk but not quite, vinyl latex caulk is for both outdoor and indoor use. It doesn’t flex as much as some other caulk we’ve discussed, so temperature-related contraction and expansion can degrade the quality of this caulk quickly.
Acrylic Latex Caulk
The last type of caulk we want to talk about is acrylic latex caulk, which is yet another acrylic-based product. This is also referred to as painter’s caulk, which is known for being inexpensive. The reason it’s called painter’s caulk is because, like vinyl latex caulk, you can paint over acrylic latex caulk. It dries fast, in roughly an hour.
Visit Our RV Maintenance Page for More Great Content!
What Type of Caulk to Use on RV Exterior?
The abovementioned caulks have plenty of differences between them. Some are intended exclusively for indoor use and others both indoor and outdoor. Even still, some of the caulks formulated for the outdoors can’t necessarily withstand the rigors of the environment well, such as vinyl latex caulk.
Some RV experts recommend silicone-based caulk, but this isn’t what we’d suggest. The lifespan of silicone, when applied on an RV, can be extraordinarily short, like a few months. You may recall also that silicone caulk doesn’t stick to porous surfaces, which would limit how you can use this caulk on your RV.
Where does that leave you? With adhesive sealant caulk, especially marine-grade stuff. Adhesive sealant caulk can handle getting wet without breaking down in many cases, and it’s durable and strong. Some adhesive sealant is even crack-proof and others can resist UV rays.
Here are three types of adhesive sealant caulk we’d suggest you use for your RV.
3M Marine Adhesive Sealant
You’re probably familiar with the brand 3M. Their Marine Adhesive Sealant should continue the brand’s track record of dependability. You don’t need to do any mixing before you apply the adhesive sealant. The bonds that form within the sealant won’t buckle from shock, structural movement, or vibrations.
Polyurethane polymers within the caulk should safeguard it from saltwater and other water damage as well as weathering from outdoor exposure. 3M even says this sealant is made for RVs and boats.
The only downside is that it takes between five and seven days for the Marine Adhesive Sealant to fully cure, which is certainly a long time to wait. On top of that, some users have reported that in very hot conditions, the caulk can come out kind of thin.
Geocel ProFlex Crystal Clear Flexible RV Sealant
Here’s another caulk made for RV use, Geocel Pro Flex. This caulk, available in 10-ounce tubes, has a flashpoint of 93 degrees Fahrenheit. Compared to the 3M caulk, you might get more temperature durability out of this one.
According to Geocel, squirting Pro Flex caulk should be easy with no stringing or mess. Whether you have damp surfaces or those that are bone-dry, this caulk is usable on them all, including oily and frozen surfaces.
Made to last 25 years, joint movement across your RV won’t affect Pro Flex, and it’s crack-resistant as well. Do keep in mind that discoloration might occur with Pro Flex, especially the longer it’s on your RV.
Dicor Non-Sag Roof Lap Sealant
If you’re still comparing your options, Dicor’s Non-Sag Roof Lap Sealant is also a pretty good choice. We wouldn’t recommend it over the Geocel or the 3M, but if you can’t find those other two products, this should suffice.
Coming out white as you apply the caulk from the tube, Dicor’s sealant is stain-proof and maintains a flexible seal for a long time to come. According to Dicor, the seal is watertight as well. That makes Dicor’s caulk a good pick for your RV although it’s not marine-grade.
Tips for Caulking Your RV‘s Roof
If this is the first time you’ll replace or refresh the seals around your RV, you might need some guidance. Luckily, we have this section that’s full of tips for successfully using adhesive sealant caulk on your RV.
Check the Seams Regularly
First, how do you even know when it’s time to caulk? Well, another job you should add to your RV maintenance routine is inspecting the seals throughout your vehicle. That goes for indoor and outdoor seals, by the way, including the windows, the roof around the ceiling and air conditioning vents, the slide-out corners, and around the door. Do this about every three months, maybe every six months if you don’t use your RV all that often.
What exactly are you looking for? Any signs of damage, from small cracks to larger ones. Any damage or wear to the sealant can lead to water leaks which is going to leave you with extensive repairs.
The caulk could have also faded away, which happens if you use the wrong type of caulk for replacing the seals of your RV.
Watch the Weather
If it turns out your RV does need more caulk, don’t just do it immediately. You want good weather for the job. Anything wet is not recommended, and the same goes for very hot temperatures. Even adhesive sealant caulk is prone to thinning if you apply it in the heat, so wait for a cooler, clear day.
Wash Your RV
If you haven’t bathed your RV in a very long time, then it’s certainly overdue. A grimy surface with all sorts of accumulated debris can prevent the caulk from adhering well, even if you buy high-quality marine-grade stuff.
Give the exterior of your RV a thorough cleaning, ensuring the surfaces around your seals especially are as spotless as you can get them.
Remove the Old Caulk
In some cases, your old caulk might have been sturdier than you thought, and, right about now, sturdier than you need. To remove old caulk, you can use an X-Acto knife, but make sure you work carefully. Cut one side of the caulk all the way down and then repeat that on the second side. Since the caulk is old and probably long since past its time for a replacement, you should find that the caulk comes off without much struggle. The only exception is if your old caulk was silicone. Then you’ll have to work a little harder.
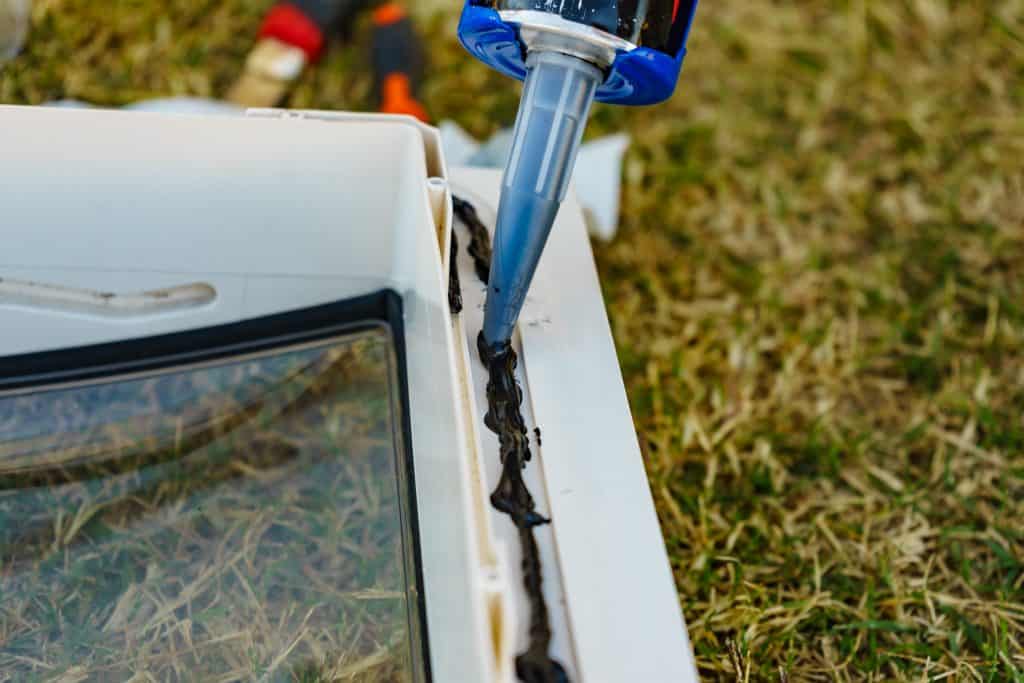
Some RVers will use a caulk gun for applying new caulk to their vehicle. If you have a lot of caulking to do, a caulk gun will let you cover a larger surface area without painfully squeezing a small tube of caulk for hours. Can’t find one? No biggie. A caulk gun, while helpful, isn’t mandatory.
Work in Small Areas
Don’t start applying caulk all over your RV. Use the caulk in small sections, about four inches apiece, so you can determine the consistency of the caulk, how messy it is, and how easy it feels to use. If you’re happy with how it’s coming out, then continue applying the caulk across your RV.
Different RV Roof Types
RV manufacturers have a handful of different options to choose from when constructing the roof of their campers. The available roof material are as follows.
- Aluminum: Typically only used on older RV’s
- Fiberglass: More expensive to replace than aluminum roofs.
- Rubber Roofing TPO: Thermoplastic polyolefin
- Rubber Roofing EPDM: Ethylene propylene diene monomer rubber
To read more about each of the RV roof types and how long these typically last, click the link.
Final Thoughts
When caulking your RV, you can’t choose any type of caulk you happen to have handy. Marine-grade adhesive sealant caulk will deliver the best results, as it’s meant to last a long time and it’s quite strong at that. It may also prevent mold and mildew accumulation, which is something you have to think about forming on the exterior of your RV.
Whether you’re patching up your RV’s caulk for the first time or the fifth, you now have plenty of great information to get the job done right the first time. Best of luck!