You love having an RV with an awning. You’re protected from sudden rainstorms and intense sun with an awning, but you’re worried about the wind. If the gusts are really strong, is there a chance your RV awning could be damaged? How much wind is too much?
If the winds exceed 20 to 25 miles per hour and is consistent, it’s time to roll up your awning for the day, especially if it’s self-supported. Otherwise, the wind can rip the awning fabric off and sometimes even send the awning flying clear off your RV!
Ahead, we’ll discuss more about the havoc wind can wreak on your RV awning, how to roll yours up in the nick of time, and even how to repair damaged awning fabric. If you’re new to RVs and you’ve only used your awning a time or two before, this is the article for you.
What’s the Fastest Wind Speed an RV Awning Can Handle?
With so many types of RV awnings out there, the wind speeds that one can take may not necessarily be the same as another. For instance, if you went with a basic awning made of fabric, then you need to take as many precautions as you can, as an awning like this is the most susceptible to falling apart.
Which is why we recommend that once wind speeds begin reaching close to 20 MPH and definitely if they hit 25 MPH that you call it a day immediately.
Other awnings in the same vein, which are known as self-supported awnings, can similarly not hold up too well against strong winds.
Self-Supported vs. Supported Awnings
What is a self-supported awning? These more basic awnings are made for one person to roll down and then roll up when you’re done using it. The flush mounting is continuous on a self-supported awning, eliminating gaps so rainwater can’t get through.
Your self-supported awning may have a wind sensor as part of its weather kit. Other distinguishable features of a self-supported awning are its tie-down straps and support legs. The lead rail will sit almost hanging in the air. This is where the biggest risk comes from, as if the wind begins blowing too gustily, your self-supported awning’s lead rail will shake.
Supported awnings are larger and sturdier, enough so that you can’t deploy them and roll them back up unless you have someone else with you who’s willing to help. The mounting brackets, of which there are several, are all independent of one another. A supported awning also includes a rain guard or a seal to keep rain out.
The weather kit of a supported awning consists of tension-inducing elastic straps that you attach to the lead rail to make it more secure. Since a supported awning has legs that go into the ground, it’s much less flimsy than a self-supported awning.
Due to that tough construction of a supported awning, it may be able to withstand winds higher than 25 MPH. That said, if you don’t want to chance awning damage in winds that strong, we certainly can’t blame you!
How to Roll up Your RV Awning Before High Winds Come Through
It’s an awfully windy day, and although you were sitting outside for hours, enjoying nature with your RV to your back, you’re thinking it’s time to take refuge inside your vehicle. You don’t want to leave your RV awning as is though, so how do you roll it up quickly?
That depends on whether your vehicle has a standard or hybrid awning. Yes, besides being supported or self-supported, an RV awning may be a hybrid or standard style as well.
Rolling up a Standard RV Awning
If your awning features spring-loaded arms, then it’s a standard awning. To close it, you want to take those arms one at a time and release them. This will lower the awning to the ground. Be careful to avoid injury when near spring-loaded arms!
Take the rafter knobs, which are often black, and loosen these. Doing so will give you the room to push the inner arms nearer your RV. You should hear and feel them lock into position when you have the spring-loaded arms right, so keep sliding them until you get them into the correct spot.
Next, find your locking lever and adjust it so it’s set to “roll up.” Then, grab the awning strap, using your awning rod for this or doing so by hand if you can. Roll up your awning and use the awning rod to get the rolled awning flush against your RV. Then, switch your locking lever to “locked.”
If your awning has any other locks or safety latches, secure these now. You should also screw in the rafter knobs so they are nice and tight. You’re then free to drive off or sit and ride out the windy conditions in the safe haven of your RV.
Rolling up a Hybrid RV Awning
A hybrid awning is an upgrade from a standard awning and may include motorized features. That makes rolling one up (and down, for that matter) easier than using a standard RV awning, as you have to do a lot less manual work.
To get started rolling up your hybrid awning, set your locking lever to “roll up.” Some hybrid awnings may not reach the ground compared to a standard awning. In that case, your awning rod will come in handy. You can use it to get the lever where you want it.
From there, you follow the rest of the steps as outlined when rolling up a standard awning. Definitely do double-check that you’ve locked all the components of your awning before you take off in your RV, as a loose awning can smash against your vehicle and cause serious damage!
Rolling up Electric Awning & Automatic Awnings
Electric awnings are retractable by pressing a button, the awning rolls itself up.
Automatic awning are the easiest and fasted to roll up and give you peace of mind knowing your not putting your awning at risk.
Some automatic awnings comes with speed sensors that will sense when the wind speed is too much for the awning and will close it automatically. How great is that? No more guessing and hoping there aren’t any wind gusts.
What Can Happen to Your RV Awning in High Winds?
Let’s say you could feel a steady wind starting to shake and rattle your RV awning, but you decided to stay out a little while longer anyway. After all, are 25 MPH winds really so bad?
According to the NERACOOS Gulf of Maine Moorings, winds of 19 to 24 MPH will cause inland waters to begin breaking waves. Most smaller trees will start swaying as well. In 25 to 31 MPH winds, you may struggle to use an umbrella because the wind will keep forcing it inside out. Also, large tree branches will sway. This data comes from the Beaufort Wind Scale, which is trusted by the National Weather Service and other major weather resources.
So yes, we’d say winds exceeding 24 MPH are pretty serious. If you don’t believe us, here’s what could happen to your RV if you don’t heed Mother Nature’s warnings.
Ripped Fabric
If your RV awning is made of fabric and the winds are blowing hard enough, there exists a good chance that your awning can get torn and ripped. Maybe not to shreds, but any hole in your RV awning is a problem. The hole will only grow bigger if you don’t fix it right away, and before you know it, your entire awning will be tattered and unusable.
Bent or Broken Awning
Truly though, some ripped fabric is the least of your problems. With self-supported awnings especially, since they’re not as secure, high winds could theoretically cause some serious wreckage to the awning as a whole. It might bend at a severe angle, parts could come flying off, and a strong storm could even break the awning.
Awning Torn Off
Let’s say the winds got even stronger and you continued to ignore them. Per the Beaufort Wind Scale, at wind speeds of 32 to 46 MPH, you won’t be able to walk against the wind without great difficulty. Twigs will also come off trees.
A self-supported awning can easily be lifted right off your RV and sent flying in these high winds. This is a huge issue, as a 12-foot roller awning with fabric may weigh upwards of 70 pounds. Now imagine a large, spear-like, 70-foot awning flying at you at high speeds. Yeah, it’s scary stuff! To make matters worse, now you don’t have an RV awning anymore either.
Smashed RV
If your awning is still attached to your RV but some loose brackets have given it movement, this is also another nightmare scenario. You only have to think about a 70-pound awning banging against the side of your vehicle to understand why. Your awning can wreck the exterior of your RV, smash windows, and cause some serious injuries if anyone is outside near the awning.
How to Protect your RV Awning from Wind Damage?
The best thing to do when you notice wind speeds increasing is the roll up the awning, but this doesn’t always happen despite your best intentions. Before you leave for the day or go to bed for the night, try to remember to put it away. There are some other things you can do to help your awning’s sturdiness for those times your forget to roll it up.
1. Stabilizer Kit
We briefly mentioned this before, but a stabilizer kit is a great inexpensive way to further protect your RV awning. Inside the kit, you’ll get two vertical metal support poles, 2 tension straps with D-rings, and 2 ground stakes. The kit is easy to install and requires no drilling and can be quickly adjusted to the height you prefer.
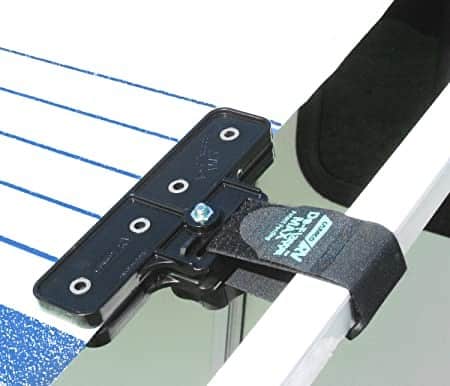
2. De-Flapper Clamps
De-flapper clamps are clamps that you install on your RV awning that help prevent the fabric was flapping so much in the wind. The ones in the link come with 2 grippers that you clamp onto your awning. These don’t cause any damage to the awning itself.
The clamp goes around the side metal poles to secure the awning in place.
Not only does it help in preventing rips and tears, but it also reduces the sound of the wind flapping the fabric.
How to Patch up Weather-Damaged RV Awning
After the storm subsides, you park your RV, pull your awning down, and assess the damage. Small tears and holes may not be as easily visible, but to reiterate, they will likely become bigger through regular wear and tear and most definitely if you leave your RV awning out in another storm.
Big tears and holes are those that are three feet and larger. These holes are more troublesome because they’re so gaping, but you’ll ideally want to repair any hole in your awning when you spot it.
To do so, you need fabric scissors, water-resistant RV glue, cleaning solution, awning tape, sewing supplies, and replacement awning.
Here are the steps to follow.
Step 1: Take Down Your Awning
You can’t easily patch up your awning if the hole is at the top and you need a ladder to reach it. To remove your awning entirely, follow the steps from earlier in this guide. Once your awning is on the ground, unfurl it completely.
The awning has end caps attached to cotter pins. Inside the end caps are openings for the inner awning tube. To get the awning tube free, you need to push the cotter pins through. Don’t touch the end caps though, as they’re spring-loaded and can cause severe injury if you get too close! Finally, free the tag bolts and you can work with your awning.
Step 2: Clean the Awning
Using your cleaning solution, give your awning a thorough wipe-down. Make sure the solution you buy is water-based so it’s non-abrasive. The solution should easily rid your awning of traces of dirt, mildew, and mold.
When you’re done with the front side of your awning, flip it over and clean the other side.
Step 3: Repair the Holes
Take a break after applying the cleaning solution, as you need any liquids applied to the awning to dry completely. Otherwise, you’re just inviting more mold and mildew in.
Once your RV awning is dried, it’s time to fix those holes. For smaller holes and tears, you can typically use awning repair tape. Make sure yours is translucent so the tape looks invisible to the naked eye. Also, press down on the tape after you apply it so you clear the air bubbles.
If your hole is bigger than three inches, then using repair tape won’t work. Instead, you’ll have to buy a patch that as closely matches the color of your current awning as possible. If you can’t find something close, call or email your RV manufacturer. For a fee, they may send you a swatch of extra awning fabric.
You want the awning patch to be two inches taller and wider than the current hole. Trimming with fabric scissors will prevent frays and strings at the ends of your awning patch that make it likely to fall apart.
If you’re a sewing maven, then you can stitch the patch into place. Otherwise, water-resistant RV glue works just as well. Glue the patch to the backside of your awning so you don’t see any glue residue on the front. Give the glue plenty of time to dry before you roll your awning back up.
Related Reading: How to Fix a Torn RV Awning
Final Thoughts
An RV awning shouldn’t be left to withstand winds higher than 20 to 25 MPH, even if your awning is a little sturdier than most. After all, you don’t want your fabric awning to rip, nor do you want the awning to become dislodged from your RV, which can happen if the weather is severe enough.
Best of luck and be safe out there!
Related Content
Every year I find myself trying out the latest camping gear to make my experience better. These items are battle-tested and can be recommended without any reservation. Keep in mind, however, that these items are not necessarily all the highest-end items. My goal on this page is to recommend gear that is priced really well while still maintaining a high-quality standard. This is the stuff I use.
Some important things to know about your travel trailer is which one to buy, how the powering system works, how to pack the travel trailer, how to keep it maintained, where to go with it, and how to drive it with ease. Here is a beginners guide to your new travel trailer.