Pouring concrete can seem like a really intimidating task if you’ve never done it before. But it’s actually not as complicated as you might think. And it definitely doesn’t have to be that expensive.
I think anyone with some diy know-how and drive can do a very good job of pouring concrete whether it be footings for a cabin or a concrete slab floor. These 12 tips will tell you what you need to know to successfully form and pour concrete.
1. Forms
The first key to a successful concrete pour is the preparation. And a big part of that is the forms. For the most part, you can use basic dimensional lumber for forms. The straighter the better, of course. 2 inch thick boards like 2x4s, 2x6s, 2x8s, and so on work really well. In a lot of cases, especially if the forms aren’t going to be too tall and if you use plenty of stakes, then you can even use 1-inch thick boards like 1x4s and 1x6s.
Forms should be reinforced with strong stakes. We used metal concrete stakes like these ones on Amazon that we picked up used, but wooden stakes can work well too. Just be aware that once you fill your forms with concrete, there will be pressure pushing outward on the forms so they need to be staked into the ground. The metal stakes have holes in them that you can run nails through to nail right into your forms.
So what about tall forms like for footings that are going deep into the ground? If you can dig your trench narrow enough, I recommend just using the dirt as your form all the way up to level ground, and then use for forms only for the above ground section of the footer. If you do need an end form or even want forms on the sides, you can build your forms out of 3/4 inch thick plywood and they’ll be fine. You may be able to even get away with 1/2 inch. In either case, just make sure you brace the forms at the bottom, middle and at ground level. We cut 2x4s to length and used them to brace up our end form for the footer we poured in the picture above.
That leads me to my next common question. How deep should a footer be for a building foundation? That depends on the frost depth in your location. That’s actually something you can probably find out at the county office where you get building permits. The frost depth is how deep the ground actually freezes in the coldest months of the year. A footer needs to get below that point to keep your building from shifting in the cold months.
Other people ask how wide footers need to be. This actually depends on the type of soil your building on as well as how tall your building will be. For a 1-story cabin a footer will need to be anywhere from 6 inches to 16 inches wide if you’re building with wood. If you’re doing block walls then that increases to 9 to 22 inches. You can see that it varies a lot. For safe construction, I highly recommend that you consult a structural engineer to give you guidance on what exactly you need. This cost will be minimal and will be way more than made up if you do the work yourself rather than hiring a concrete crew to pour your footer for you.
What about slabs/floors? How thick should a concrete floor or slab be? This answer is a little more straightforward. For most residential construction, 4 inches is a great thickness for a concrete slab. If you’re going to be parking a heavy tractor or motorhome on it, though, you should increase it to 5 or 6 inches.
2. Outside Temperature
What outside temperature is ideal for concrete? Really, you’re best off pouring concrete only when the air temperature is about 50°F (10°C or 283.15 K for those who are interested) or greater. If the concrete is too cold it will take a lot longer to setup. And if there is risk of freezing at night, it could lead to cracking and other structural problems. If daytime temperatures are about 50° or higher though, you should be fine.
How hot is too hot for pouring concrete? This answer isn’t as simple. Higher temperature does actually speed up the cure time in concrete, and there is some concern that if the surface cures much faster than the concrete underneath then it could lead to cracking and lower strength in the concrete. However, this ends up being an issue only in particularly dry climates. In humid climates, water from the air will actually condense on the cooler concrete and keep the surface moist.
As part of the curing process, it’s actually good practice to spray a mist of water over the surface of the concrete, especially a slab with high surface area, twice in a 24-hour period.
3. Reinforcing concrete
Concrete is interesting. It seems super strong. And it holds up really well under compression (like when you’re pushing down on it). But it’s actually really weak under expansion. When you walk across a concrete floor, the top side of the floor is under compression. But the bottom and ends are under expansion. That’s why we typically reinforce concrete with metal that holds its shape under this kind of expansion.
There are a couple primary materials that we use to reinforce concrete. The first is rebar.
Rebar is used especially in footers but sometimes even in slabs. If you’re putting it in a slab, laid horizontally, you’ll want to use #3 rebar. The number has to do with its thickness, and #3 is the lightest of the typical residential rebar sizes. For concrete or block walls, you’ll want to use #4 and for footers you should use #5. Thicker rebar adds more tensile strength to the concrete.
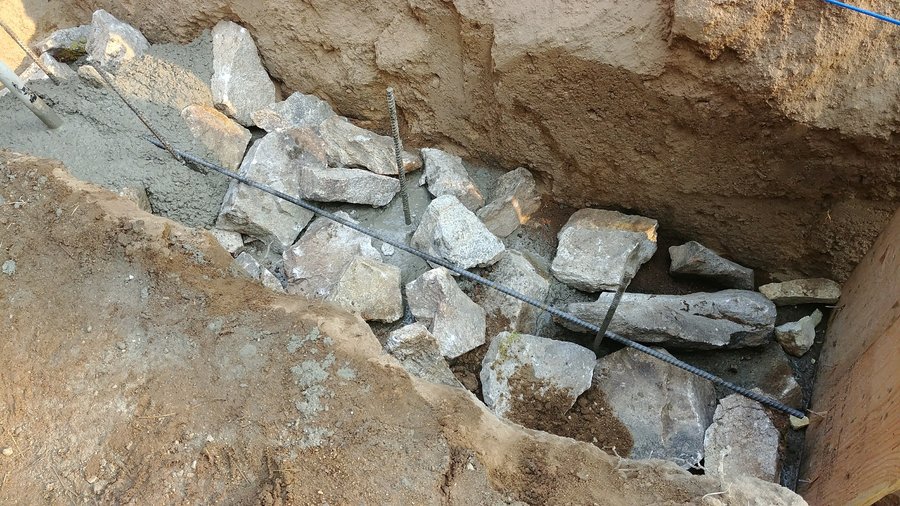
In a footer, you should run one piece of rebar the length of the footer near the bottom, but off the ground so that it’s surrounded by concrete when you’re done. You’ll also want a vertical piece of rebar the height of the footer about every 2 feet. You can see what I’m talking about in the picture below. About every 1 1/2 feet you should add another horizontal piece of rebar. If you don’t have pieces the whole length of the footer, you can use two, just make sure they overlap. It’s good practice to even tie them together using wire ties. But as long as they overlap you’ll be alright.
You can also see in the picture below that we used some stone in our footer. It’s okay to toss some large rocks into the footer as long as those rocks are strong and dense, like the concrete. You wouldn’t want to use a light, porous rock in your footer. But in this case, we have an old mine nearby with loads of granite pieces like these, so we use them as part of the footer. It’s not so much about additional strength, and more about using less concrete mix. It basically saves us money, time, and work.
Another material you can use to reinforce concrete is wire mesh. You can pick this up at the local hardware store, if you like. It’s basically heavy metal wire in a square or rectangle mesh grid pattern. The mesh is nice, especially for slabs, because it adds tensile strength in two directions, and you don’t have to tie anything together. With rebar, to get it to stay in place you would basically make a grid and tie all the intersections together with wire ties. The wire mesh basically does all that for you.
I like to lay out a piece of mesh running from one end of the slab to the other and place it on little stands so that the mesh is about midway between the top and bottom of the slab. For a 4-inch slab, the mesh would be about 2 inches off the ground.
4. When to use Expansion Joints
If you’re pouring a slab that’s fairly large, you’ll want to consider expansion joints.
As temperatures shift, concrete actually expands and contracts. So for really large slabs, you tend to get cracking. The idea behind the expansion joint is it gives the concrete room to grow and shrink without cracking.
The general rule of thumb for when you need expansion joints is to take the thickness of the slab in inches, multiply that by 2-3, and that number in feet is the length you can go between expansion joints. For example, for a 4-inch thick slab you multiply 4 by 2-3 to get 8-12. You can go 8-12 feet in either direction between joints. So if the room is about 10×10, I might forego the joints altogether, but it would be iffy. If it’s a 4 x 6 outhouse, then I wouldn’t worry about it.
For the joints, just build your form, and then where you want a joint, lay a piece of clapboard siding in place. That makes for a great joint. On one side of it, place stakes in the ground to hold the joint in place while you pour the other side. Once that concrete is setup, you can take out the stakes, and pour the other side of the joint. That piece of clapboard siding will stay in place as an expansion joint.
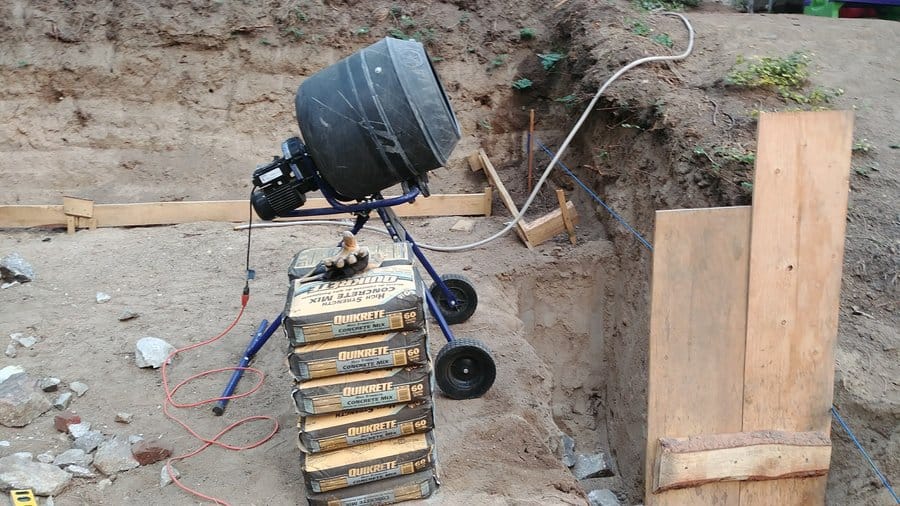
5. Get an Inexpensive Cement Mixer
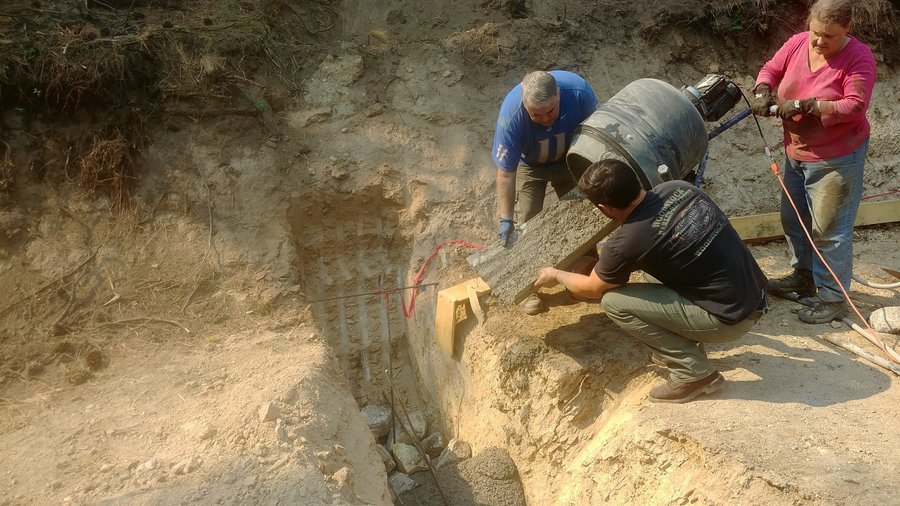
We used to mix concrete bags one at a time by hand. We’d dump the bag in a wheelbarrow, add water, and use a shovel to stir. If you’re pouring a building footer or doing a floor for a small building, it’ll be worth it to buy a mixer. The cost is way low compared to the cost of hiring out this work, and it will cut your work time in half at least.
We bought a mixer last year before we built our outhouse and we’ve used it over and over again. Ours is just like this one on Amazon except ours is blue. The price is right for the time it’ll save you. Not to mention the soreness you’ll avoid.
When you mix the concrete, I like to add some water first. Maybe a gallon or two. We then turn on the mixer. Then we have one person cut open the top of a bag and dump it in while the other keeps spraying in water. After the second bag is in, we let it mix for a bit. You’ll know there’s enough water if it all flows well in the mixer, but it’s still thick enough that if you stopped the mixer it would mostly hold it’s form. If it runs down to fairly smooth, then it’s too thin and you need to add more mix.
You’ll get the hang of it pretty fast. I find it’s easy to add more water, so I try not to overdo the water from the start.
We also keep the mixer running while we pour out the concrete. It makes it easy to get all of the concrete out of the mixer and poured into the forms.
For power, we just used our dependable generator. It had more than enough output to run the mixer and the stinger (cement vibrator) that we’ll talk about next. If you want to learn about what generator I recommend for this type of work, you can read my article on that here.
6. Get a Cement Vibrator or Stinger
When I was in college, I spent a summer working for a manufacturer of precast concrete stuff. We made a bunch of those manhole cylinders you see when they’re out building new neighborhoods. Anyway, it was there that I was introduced to the stinger.
A stinger is just a tool with a long, rubbery neck and a heavy metal end that vibrates when turned on. All you do is turn it on and put the end into the concrete and watch the concrete settle. Of course, you’ll run it up and down the depth of the concrete and move it around a bit, but the job of the stinger is to get the concrete to settle, and it does a terrific job.
Before we bought our own stinger, we used to pour the concrete and then stick a shovel or heavy pole into the concrete over and over to try to get it to settle. It was never great, but it kind of worked. But with the stinger, the concrete just settles out pretty flat in a matter of seconds. And for the cost it was way worth it!
Here’s an inexpensive one on Amazon that has worked really well for us for several jobs. If you were pouring concrete professionally every day I would recommend something more durable. But this one has held up really well for several jobs and has made the work 10 times easier and cut our work time way down. If you’re only doing
7. Water
For water, we use a 275 gallon water tote that we brought full of water and parked uphill from where we were mixing. Then, we just connected a hose and used a garden sprayer on the end to fill our mixer for each batch. If you want to find out where to get water totes like ours inexpensively you can read all about that here. They’re just really handy for hauling water up to the cabin and storing it for either cleaning or even drinking purposes.
8. Buy 60-lb bags of mix
This is a simple tip, but it makes a huge difference. You can save a few cents on concrete by buying 80-lb bags. But don’t do it. If you’re going to pour a footing like this, you could be looking at lifting dozens of these in a day, and 60 lbs is a lot lighter than 80 lbs after you’ve lifted 50 of them.
Plus, these cement mixers do a great job of mixing 2 60-lb bags at a time. 2 80-lb bags is too much.
If you want to save a few dollars and you’re doing a big job like this, buy your concrete mix by the pallet. You often get better pricing and you’ll be glad you went with smaller bags.
9. Get yourself a makeshift cement chute
This is pretty simple, but if you’re going to pour a footing, if you get your mixer too close to the hole the ground will want to cave in a little. Give yourself a little more length on the pour by making a little cement chute. This also allows you to direct the concrete right where you want it rather than trying to steer the mixer itself.
For our chute, we just used a scrap piece of metal roofing. It did a great job and was free since it was just an extra scrap.
10. Add some Grading to your Slab
For concrete slabs, it’s a good idea to have some grade or slope. This helps prevent water from pooling.
One helpful way to get the grading right is to just build your forms that way. But if you’re pouring a slab inside a footer, you’ll have to do your grading more manually.
For large slabs, like driveways, you can get away with a grading as little as 1/8 of an inch for every foot of length. For smaller applications it’s better to go with 1/4 inch per foot. If you’re doing your grading on the inside of a footer, mark the footer every few feet at least with what the height should be at that spot on the footer. If you’ve marked it, or if the top of the forms is already at the correct slope, then you can just shoot for a consistent slope along the length of your slab.
For rooms or buildings, you want the grade to go toward the door or toward a drain. In a small building without a floor drain, toward the door works great. But it means you need to slope toward the wall where the door is, and also along that wall from the corners of the room toward the door.
11. Screed / Smooth the top of your Slab
To level out your slab and get the top pretty smooth, you’ll want to screed it. The least expensive way to do this is with a straight length of 2×4. You can run the 2×4 back and forth over the top of the concrete to smooth it out. You can sort of tap the concrete with the 2×4 as well. The more you work it the more the gravel in the mix will settle leaving a smooth top. Use the 2×4 to level it out leaving a nice, constant grade.
12. Finishing (float, steel finishing trowel, groover)
Once your slab has been screeded, you’re ready to finish it. For this, start with a concrete float. Just run it over the concrete, working the surface to get it smooth. Level out any lumps and fill any low spots.
Once you’ve floated it, you can use a steel finishing trowel to get it smooth. As you run the finishing trowel over the surface, tilt it a little upward so that the front edge doesn’t dig into the concrete. Just run over the surface until it looks nice to you.
If you want to add some shaping to the edges, like a nice rounded edge, then after you’ve finished all these steps you can use an edge and run along the edge right up against the form to get a nice rounded edge on top. If you try and the concrete doesn’t hold its shape, then it needs to set up a little more. Just wait a few minutes and try again.
If you want a little bit of a rough surface so it doesn’t get slippery or because you want to tile it, you can gently run a broom over the top. This will put little grooves into the surface of the concrete giving it a light, rough appearance.
Visit Our Cabins Page for More Great Content!
That’s about it

I know it seems like there’s a lot to concrete. But really, it’s not that bad. If you know someone that’s done it before, ask for a hand the first time. It’s a skill you can pick up quickly and by doing so, you’ll save a fortune. Especially if you’re doing this work in a rural area where a crew would have to travel to get to the worksite. I’ve done a lot of my own concrete work and it’s definitely been worth it!